Minimal Permissions Requirement for User Performing CDAI Onboarding
Purpose:
These permissions are the minimal required for executing the CDAI onboarding script. The script creates custom roles, service accounts, and IAM bindings across organization and project scopes.
1. Organization-Level Permissions
Required Roles:
• Organization Role Admin (roles/iam.organizationRoleAdmin)
• Organization Admin (roles/resourcemanager.organizationAdmin)
2. Project-Level Permissions (On base project)
Required Roles:
• Project IAM Admin (roles/resourcemanager.projectIamAdmin)
• Service Account Admin (roles/iam.serviceAccountAdmin)
3. Summary of Required Access
CloudDefense.AI GCP Single Project Onboarding Process
Important: For a smooth functioning of scans, below mentioned permissions needs to be enabled for each project you want to onboard
- IAM Service Account Credentials API
- Cloud Resource Manager API
- Compute API
- IAM API
- Cloud Function API
- SQLAdmin API
- Container API
- API keys API
- PubSub API
- CloudKMS API
- Artifact Registry API
Single Onboarding STEP 1:
Login to CloudDefense portal using your credentials.

From the Sidebar, navigate to Admin -> Environments.
Now Click on Add New Environment and then choose GCP provider as below.

Single Onboarding STEP 2:
Select Single GCP Project and click Next.

Now, give this project an account name as desired, which will be used as its identifier. You can also add relevant tags, if needed. Click Next.

Now select your Organization from the drop down menu and click next.

Single Onboarding STEP 3:
This is the final step now.
1. Create your Google Cloud service account
Open your Google Cloud Console
Go to the project you want to onboard.
Navigate to IAM & Admin > Service Accounts.
Click on Create service account at top.
Give the service account a unique name, then click Create and continue.
Add following Roles to the service account
Viewer
Click Continue to complete creating the service account.
2. Add CloudDefense.AI principal to this service account
In Google Cloud console, under the Service Accounts menu, find the service account you just created.
Go to the Permissions tab and click on Grant Access.
Copy the cloudDefense.AI principal service account ID below, and Paste it into the New Principals text box
cdai-service-account@first-project-476708.iam.gserviceaccount.com
Assign the role of Service Account Token Creator and click Save
3. Complete Onboarding setup
Now in Google Cloud console, navigate to the Service Account > Details tab. You can find the email associated with this Google service account.
It resembles sa-name@project-id.iam.gserviceaccount.comCopy this email and paste in input box in left section and click Connect Project button.

Now, just click on Connect Project and the onboarding is completed!
CloudDefense.AI GCP Multi Onboarding Process
Important: For a smooth functioning of scans, below mentioned permissions needs to be enabled for each project you want to onboard
- IAM Service Account Credentials API
- Cloud Resource Manager API
- Compute API
- IAM API
- Cloud Function API
- SQLAdmin API
- Container API
- API keys API
- PubSub API
- CloudKMS API
- Artifact Registry API
Multi Onboarding STEP 1:
Login to CloudDefense Portal.

From the Sidebar, navigate to Admin -> Environments.
Now Click on Add New Environment and then choose GCP provider as below

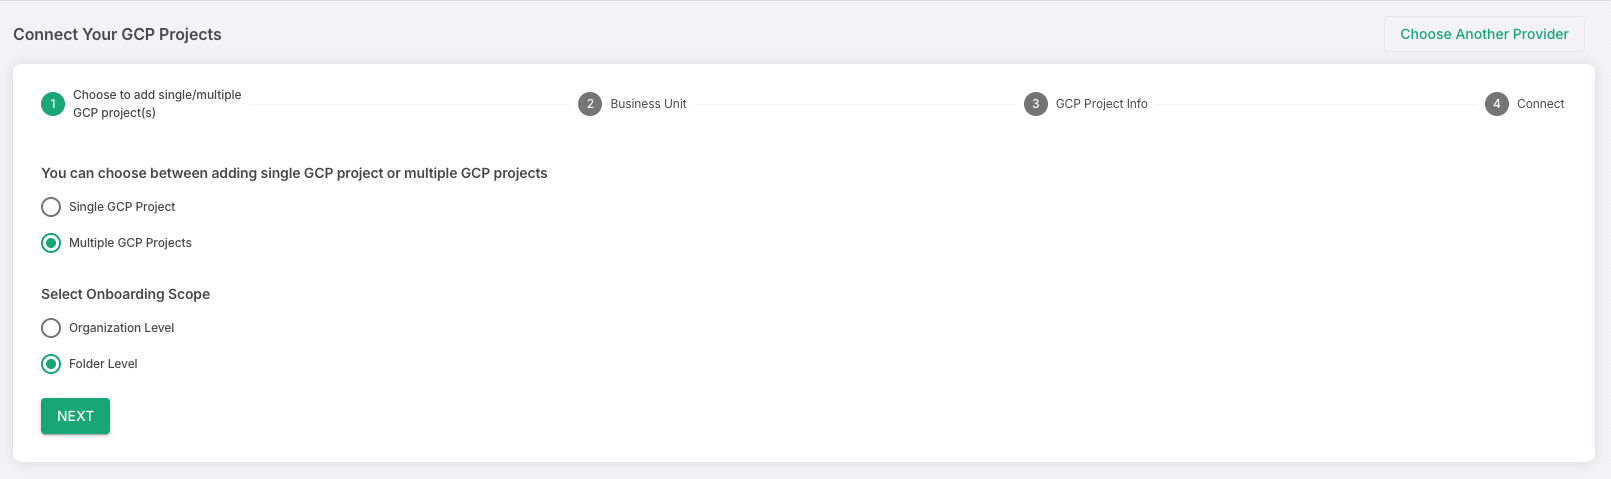
Multi Onboarding STEP 2:
Select Multiple GCP Projects and then select if you wish to onboard your GCP organisation or a specific folder inside the organisation.
Multi Onboarding STEP 3:
Now select your Organization from the drop down menu and click next.

Multi Onboarding STEP 4:
For organisation onboarding:

Enter the project ID of any one of your projects (we will use this project as the master project to onboard all the other projects under the organisation).
Enter the GCP organisation ID in the next input box.
Now, click, generate Bash Script and download it.

Template of script that will get downloaded for organization level onboarding.
#!/bin/bash

# Variables
PROJECT_ID=first-project-476708
CLIENT_PROJECT_ID=<CLIENT_PROJECT_ID>
CLIENT_ORGANIZATION_ID=<CLIENT_ORGANIZATION_ID>
CDAI_PRINCIPAL=cdai-service-account@first-project-476708.iam.gserviceaccount.com
CDAI_CUSTOMROLE_PL=CDAI_custom_role_1_<unique_number>
CDAI_CUSTOMROLE_OL=CDAI_custom_role_2_<unique_number>
CDAI_SERVICE_ACCOUNT=cdai-service-account-<unique_number>

# Setting up base project
gcloud config set project $CLIENT_PROJECT_ID

# Creating service account to manage access to projects
gcloud iam service-accounts create $CDAI_SERVICE_ACCOUNT --description="CDAI SA for onboarding" --display-name="CDAI service account"

# Creating custom role 1 for getting tokens for authentication purpose
gcloud iam roles create $CDAI_CUSTOMROLE_PL --project=$CLIENT_PROJECT_ID --title="CDAI role 1" --description="CDAI service account role at project level" --permissions="iam.serviceAccounts.get,iam.serviceAccounts.getAccessToken,iam.serviceAccounts.list" --stage=ALPHA

# Creating custom role 2 for listing subfolders and projects
gcloud iam roles create $CDAI_CUSTOMROLE_OL --organization=$CLIENT_ORGANIZATION_ID --title="CD_AI role 2" --description="CDAI service account role at organization level" --permissions="resourcemanager.projects.get,resourcemanager.projects.list,resourcemanager.folders.get,resourcemanager.folders.list,resourcemanager.projects.getIamPolicy,resourcemanager.folders.getIamPolicy,iam.serviceAccounts.getIamPolicy" --stage=ALPHA

# Assigning custom roles to service account at org level
gcloud organizations add-iam-policy-binding $CLIENT_ORGANIZATION_ID --member="serviceAccount:$CDAI_SERVICE_ACCOUNT@$CLIENT_PROJECT_ID.iam.gserviceaccount.com" --role="organizations/$CLIENT_ORGANIZATION_ID/roles/$CDAI_CUSTOMROLE_OL"

gcloud projects add-iam-policy-binding $CLIENT_PROJECT_ID --member="serviceAccount:$CDAI_SERVICE_ACCOUNT@$CLIENT_PROJECT_ID.iam.gserviceaccount.com" --role="projects/$CLIENT_PROJECT_ID/roles/$CDAI_CUSTOMROLE_PL"

# Granting access to CDAI-principal account to impersonate service account
gcloud iam service-accounts add-iam-policy-binding $CDAI_SERVICE_ACCOUNT@$CLIENT_PROJECT_ID.iam.gserviceaccount.com --member="serviceAccount:$CDAI_PRINCIPAL" --role="roles/iam.serviceAccountTokenCreator"

# Granting READ-ONLY-ACCESS to newly created service account at organization level
gcloud organizations add-iam-policy-binding $CLIENT_ORGANIZATION_ID --member="serviceAccount:$CDAI_SERVICE_ACCOUNT@$CLIENT_PROJECT_ID.iam.gserviceaccount.com" --role="roles/viewer"

echo "Process is waiting for role attachment completion as GCP usually takes some time"
sleep 5

echo "copy this service account email into the Clouddefense.ai browser window -> $CDAI_SERVICE_ACCOUNT@$CLIENT_PROJECT_ID.iam.gserviceaccount.com"
For folder level onboarding:

Enter the project ID of any one of your projects (we will use this project as the master project to onboard all the other projects under the folder).
Enter the GCP organisation ID in the next input box.
Enter the folder ID which you wish to onboard.
Now, click, generate Bash Script and download it.
 Template of script that will get downloaded for folder level onboarding.
#!/bin/bash

# Variables
PROJECT_ID=first-project-476708
CLIENT_PROJECT_ID=<CLIENT_PROJECT_ID>
CLIENT_FOLDER_ID=<CLIENT_FOLDER_ID>
CLIENT_ORGANIZATION_ID=<CLIENT_ORGANIZATION_ID>
CDAI_PRINCIPAL=cdai-service-account@first-project-476708.iam.gserviceaccount.com
CDAI_CUSTOMROLE_PL=CDAI_custom_role_1_<unique_number>
CDAI_CUSTOMROLE_OL=CDAI_custom_role_2_<unique_number>
CDAI_SERVICE_ACCOUNT=cdai-service-account-<unique_number>

# Setting up base project
gcloud config set project $CLIENT_PROJECT_ID

# Creating service account to manage access to projects
gcloud iam service-accounts create $CDAI_SERVICE_ACCOUNT --description="CDAI Service Account for onboarding" --display-name="CDAI service account"

# Creating custom role 1 for getting tokens for authentication purpose
gcloud iam roles create $CDAI_CUSTOMROLE_PL --project=$CLIENT_PROJECT_ID --title="CD_AI role 1" --description="CDAI service account role at project level" --permissions="iam.serviceAccounts.get,iam.serviceAccounts.getAccessToken,iam.serviceAccounts.list" --stage=ALPHA

# Creating custom role 2 for listing subfolders and projects
gcloud iam roles create $CDAI_CUSTOMROLE_OL --organization=$CLIENT_ORGANIZATION_ID --title="CD_AI role 2" --description="CDAI service account role at organization level" --permissions="resourcemanager.projects.get,resourcemanager.projects.list,resourcemanager.folders.get,resourcemanager.folders.list,resourcemanager.projects.getIamPolicy,resourcemanager.folders.getIamPolicy,iam.serviceAccounts.getIamPolicy" --stage=ALPHA

# Assigning custom roles to service account at folder level
gcloud resource-manager folders add-iam-policy-binding $CLIENT_FOLDER_ID --member="serviceAccount:$CDAI_SERVICE_ACCOUNT@$CLIENT_PROJECT_ID.iam.gserviceaccount.com" --role="organizations/$CLIENT_ORGANIZATION_ID/roles/$CDAI_CUSTOMROLE_OL"

gcloud projects add-iam-policy-binding $CLIENT_PROJECT_ID --member="serviceAccount:$CDAI_SERVICE_ACCOUNT@$CLIENT_PROJECT_ID.iam.gserviceaccount.com" --role="projects/$CLIENT_PROJECT_ID/roles/$CDAI_CUSTOMROLE_PL"

# Granting access to CDAI-principal account to impersonate service account
gcloud iam service-accounts add-iam-policy-binding $CDAI_SERVICE_ACCOUNT@$CLIENT_PROJECT_ID.iam.gserviceaccount.com --member="serviceAccount:$CDAI_PRINCIPAL" --role="roles/iam.serviceAccountTokenCreator"

# Granting READ-ONLY-ACCESS to newly created service account at folder level
gcloud resource-manager folders add-iam-policy-binding $CLIENT_FOLDER_ID --member="serviceAccount:$CDAI_SERVICE_ACCOUNT@$CLIENT_PROJECT_ID.iam.gserviceaccount.com" --role="roles/viewer"

echo "Process is waiting for role attachment completion as GCP usually takes some time"
sleep 5

echo "copy this service account email into the Clouddefense.ai browser window -> $CDAI_SERVICE_ACCOUNT@$CLIENT_PROJECT_ID.iam.gserviceaccount.com"
STEP 5:
Open your Google Cloud Console.
You will be navigated to Cloud Shell Editor and the terminal will be opened at the bottom of your screen.
If the terminal is not opened, click Open Terminal Icon on top right of your screen. As shown in the screenshot below.
Drag and drop the CDAI-onboarding bash file (downloaded in the previous step) into the Editor. Your file will be opened in Editor.
Press Ctrl + S to save the file. Keep the default location to save, click OK to save the file.
Type the following command in the terminal below to login to the terminal.
gcloud auth login
You might be logged in previously to the terminal, we still recommend completing the instructions below.
Follow the instructions in the terminal, to complete the sign-in process.
(sign-in link will be provided in terminal, click the link to sign-in)
NOTE: when selecting any google account to login, or logging In to any google account, make sure to login into the organisation account that has following required permissions.organisation role administrator (to be able to create custom roles)
service account admin (to be able to create service accounts)
org admin (to access projects in the org)
Once the sign-in process is completed, you will be navigated to the confirmation screen. (as in screenshot below)
Copy the verification code and Paste this code in the google console terminal and press Enter. You will be logged in with your Google account to the terminal.

Type the following command in the terminal to set Project ID for connecting your Project to CloudDefense.AI. Replace <master_project_id> with the project_id you provided earlier in Step 4
gcloud config set project <master_project_id>
Run the following command into the terminal to execute the bash file saved in your editor.
bash CDAI-onboarding.sh
Copy the client base project service account email id, generated at the end of the script.

Paste in the input box in the left section
Now, just click on Connect Project and the onboarding is completed!
Was this article helpful?
That’s Great!
Thank you for your feedback
Sorry! We couldn't be helpful
Thank you for your feedback
Feedback sent
We appreciate your effort and will try to fix the article